前言
第五篇来了! 还是3个小例子,仍然是主要部分用Masonry手写代码实现,其它的约束在storyboard里面直接拖拽搭建。三个例子分别是:
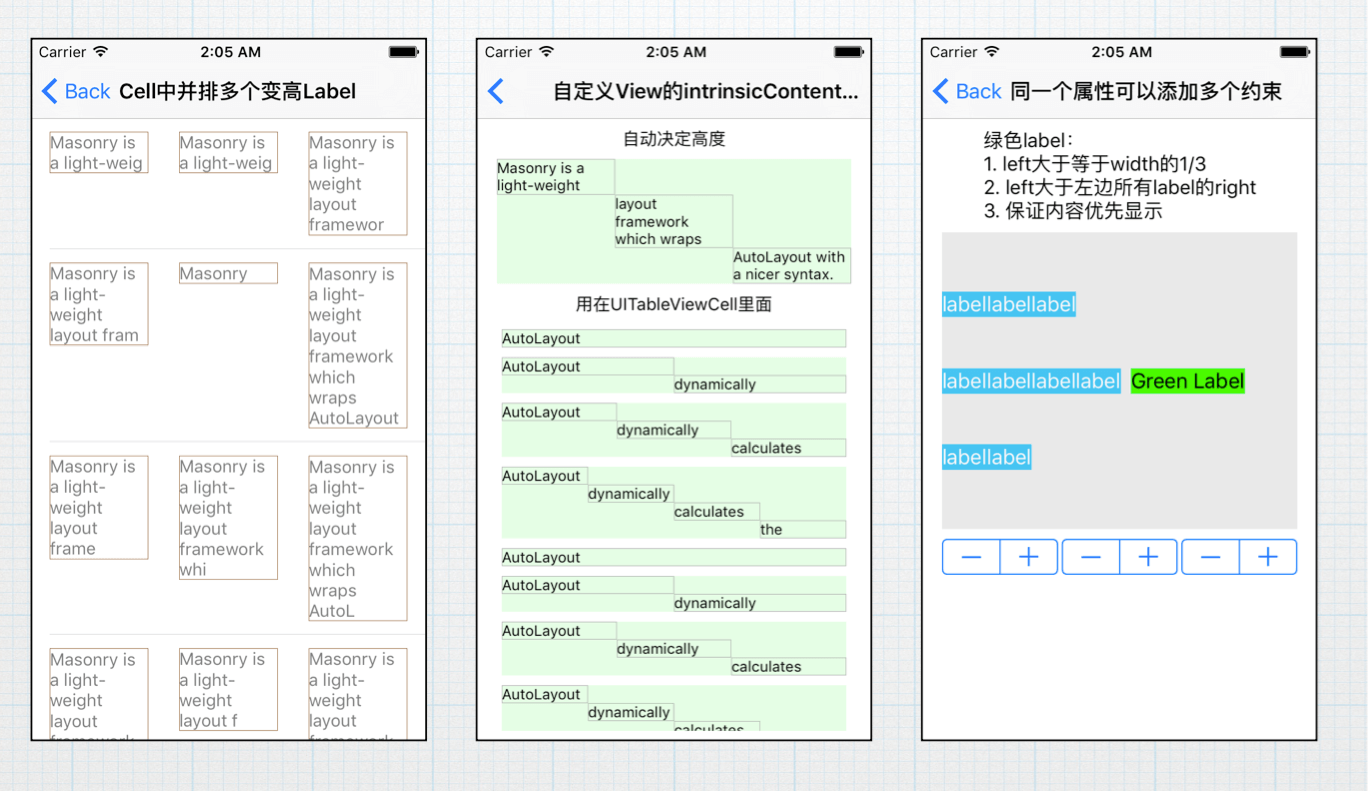
- UITableViewCell中多个变高的Label
- StairView自定义View的
intrinsicContentSize,并支持在UITableViewCell中自动计算高度 - 给同一个属性添加多重约束,实现复杂关系
前四篇:
- 第一篇:有趣的Autolayout示例-Masonry实现
- 第二篇:有趣的Autolayout示例2-Masonry实现
- 第三篇:有趣的Autolayout示例3-Masonry实现
- 第四篇:有趣的Autolayout示例4-Masonry实现
Github地址: https://github.com/zekunyan/AutolayoutExampleWithMasonry
Case1: UITableViewCell中多个变高的Label
实现功能
功能就是Cell整体变高,内部水平三个Label,宽度一样,高度由内容决定。
在本例子中,Label的宽度定为80,避免多行Label的preferredMaxLayoutWidth的设置干扰。
原理
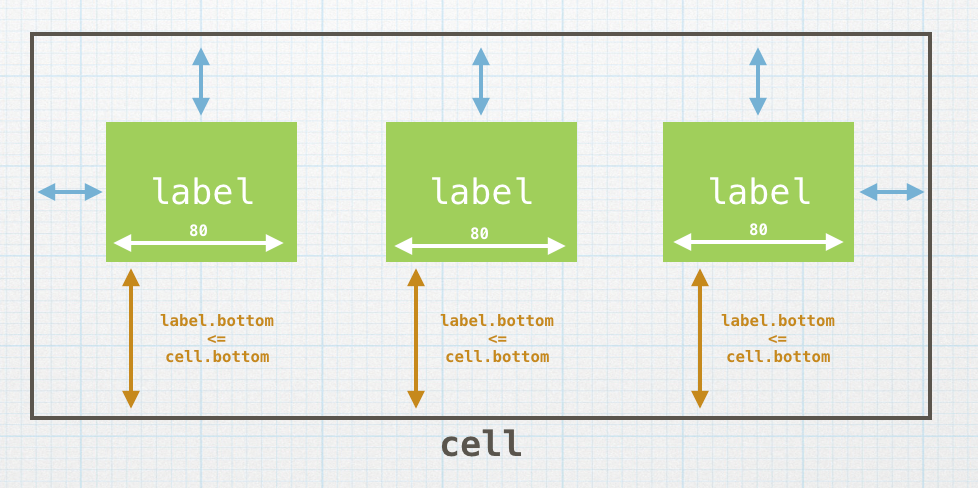
原理一句话就是:Cell的高度由三个Label中最高的得出。
但是,实际设置Autolayout的时候,不存在什么cell.height = MAX(labels.height)这样的关系。
所以要转换一下,改为**ANY(label.bottom) <= cell.bottom,即每个Label的底部bottom都是在cell的底部bottom上面的**,换算到坐标系里面,就是在Y轴上,label.bottom <= cell.bottom。
所以,cell的约束如下图所示:
代码细节
对应的代码如下:
- (void)setupLayout {
    // label1的约束
    [_label1 mas_makeConstraints:^(MASConstraintMaker *make) {
        make.width.equalTo(@80); // 宽度80
        make.top.equalTo(self.contentView.mas_topMargin); // 上
        make.left.equalTo(self.contentView.mas_leftMargin); // 左
        // label.bottom <= cell.contentView.bottom,注意是在Y轴上对比
        make.bottom.lessThanOrEqualTo(self.contentView.mas_bottomMargin);
    }];

    // label2的约束
    // 类似...
    // label3的约束
    // 类似...
}
Case2: StairView自定义View实现intrinsicContentSize
实现功能
实现一个自定义布局的View - StairView,阶梯布局View。 StairView支持设置Label成阶梯状从上到下、从左到右分布,如下图:
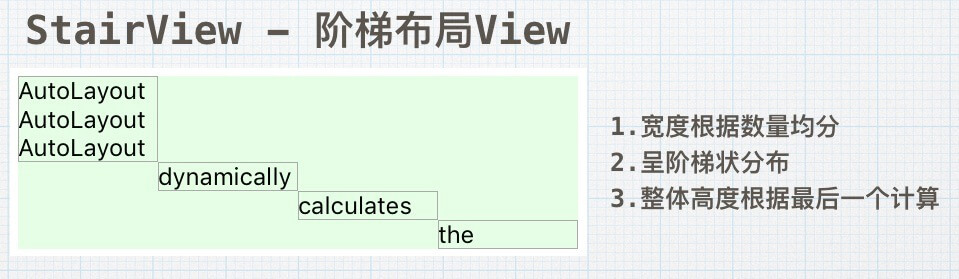
同时,StairView要支持Autolayout,支持大小由内容决定,可以在Cell里面用,并自动计算高度。
接下来,看看如何实现这个StairView。
intrinsicContentSize是什么
如果说到Autolayout的内容决定大小,就会遇到intrinsicContentSize方法,这个方法是什么呢?
intrinsic单词的意思:
adj.固有的,内在的,本质的; [解剖]体内的; 本征; 先天性
而intrinsicContentSize方法的官方解释是:
Returns the natural size for the receiving view, considering only properties of the view itself.
所以,UIView的intrinsicContentSize,就是获取这个View的固有的,内在的,本质的的内容大小。
在看Discussion部分:
Custom views typically have content that they display of which the layout system is unaware. Overriding this method allows a custom view to communicate to the layout system what size it would like to be based on its content. This intrinsic size must be independent of the content frame, because there’s no way to dynamically communicate a changed width to the layout system based on a changed height, for example.
比较长,简单说,就是Autolayout布局系统是不知道自定义View的内容大小的,所以自定义View可以重写这个方法,返回自己的内容大小,交由Autolayout布局系统去计算布局。并且,这个大小是不能依赖外部的大小的。
所以,如果我们的View的大小是固定的时候,最简单,直接返回即可:
- (CGSize)intrinsicContentSize {
    return CGSizeMake(100, 100); // 固定100x100大小
}
如果大小需要计算,就要先计算,然后返回:
- (CGSize)intrinsicContentSize {
    // 先计算内容大小,可以按情况缓存,减少计算量
    CGSize contentSize = [self calculateContentSize];
    // 返回
    return contentSize;
}
有了intrinsicContentSize的返回大小,Autolayout的布局系统才能正确的布局。
StairView的实现
清楚了intrinsicContentSize的作用以后,就可以着手实现StairView了。
API设计
为了尽量简单,StairView的方法只有一个:
/**
 *  设置阶梯title
 *  @param titles 标题数组
 */
- (void)setStairTitles:(NSArray <NSString *> *)titles;
直接传入字符串数组即可。
内部属性
StairView内部由UILabel组成实现,所以需要一个数组保存所有的Label,还要一个CGSize类型的变量,保存当前的内容大小:
@interface StairView ()
@property (nonatomic, strong) NSMutableArray <UILabel *> *itemViews; // Label数组
@property (nonatomic, assign) CGSize contentSize; // 内容大小,随时更新
@end
设置阶梯标题: setStairTitles:的实现
接着就是实现setStairTitles:方法。
基本逻辑就是: 删除旧的Label->循环创建新的Label->重新布局:
- (void)setStairTitles:(NSArray<NSString *> *)titles {
    // 批量从superView删除旧的Label
    [_itemViews makeObjectsPerformSelector:@selector(removeFromSuperview)];

    // 重新创建
    _itemViews = [NSMutableArray new];

    // 循环创建新的Label
    for (NSString *title in titles) {
        UILabel *label = [UILabel new];
        // 设置样式
        label.text = title;
        label.font = [UIFont systemFontOfSize:12];
        label.layer.borderColor = [UIColor lightGrayColor].CGColor;
        label.layer.borderWidth = 1.0f / [UIScreen mainScreen].scale;
        label.numberOfLines = 0;
        [self addSubview:label];
        // 添加Label
        [_itemViews addObject:label];
    }

    // 重新布局
    _contentSize = CGSizeZero;

    // 重点!
    [self updateStairLayout];
}
内部阶梯Label的布局+intrinsicContentSize的计算: updateStairLayout的实现
从上面的设置代码可看出,重点是对内部Label布局的updateStairLayout方法,按照前面所说的功能要求,基本的原理就是:
根据当前阶梯数量计算每个Label的平均width->遍历所有Label计算当前width下的高度->设置每个Label的frame->更新contentSize
- (void)updateStairLayout {
    if (_itemViews.count == 0) {
        // 没有设置内容,内容大小为零
        _contentSize = CGSizeZero;
        return;
    }

    // 计算每个Label的平均宽度
    CGFloat eachLabelWidth = CGRectGetWidth(self.bounds) / (CGFloat)_itemViews.count;
    CGFloat lastY = 0;
    CGFloat lastX = 0;

    for (UILabel *label in _itemViews) {
        // 根据内容、当前width计算高度
        label.preferredMaxLayoutWidth = eachLabelWidth;
        CGFloat height = [label sizeThatFits:CGSizeMake(eachLabelWidth, 0)].height;

        // 设置frame
        CGRect frame = CGRectMake(lastX, lastY, eachLabelWidth, height);
        label.frame = frame;

        // 更新下一轮
        lastX += eachLabelWidth;
        lastY += height;
    }

    // 更新contentSize
    CGSize newContentSize = CGSizeMake(CGRectGetWidth(self.bounds), lastY);

    // 判断内容大小是否有变化
    if (!CGSizeEqualToSize(newContentSize, _contentSize)) {
        // 更新contentSize
        _contentSize = newContentSize;

        // 通知外部IntrinsicContentSize失效
        [self invalidateIntrinsicContentSize];
    }
}
- 要先判断设置的阶梯title数量是否为零,否则计算平均宽度时会导致除数为零的Crash
- 每个Label的高度,根据当前的平均宽度,用
sizeThatFits:计算得出 - 最后更新
_contentSize的值 - 重点!
[self invalidateIntrinsicContentSize]通知外界,StairView的内容大小发生变化
计算内部Label布局的原理还是很简单的,重点就是最后的更新_contentSize和调用[self invalidateIntrinsicContentSize]。
通知外界内容大小发生变化-invalidateIntrinsicContentSize方法
先看看官方文档的解释:
Call this when something changes in your custom view that invalidates its intrinsic content size. This allows the constraint-based layout system to take the new intrinsic content size into account in its next layout pass.
意思就是,当自定义View的内容大小发生变化时,调用此方法通知布局系统,在下一次布局更新中刷新。
所以,对照上面的代码:
// 判断内容大小是否有变化
if (!CGSizeEqualToSize(newContentSize, _contentSize)) {
    // 更新contentSize
    _contentSize = newContentSize;

    // 通知外部IntrinsicContentSize失效
    [self invalidateIntrinsicContentSize];
}
就很明显了,就是按照文档的说明做的。
关键:何时调用updateStairLayout更新布局、刷新contentSize
有了updateStairLayout方法来布局、计算contentSize,也用了invalidateIntrinsicContentSize通知系统刷新,那么剩下来的关键就是何时何地调用更新布局、contentSize
在layoutSubviews的时候
这里很明显,layoutSubviews就是刷新自定义view的地方,系统会在布局的过程中,多次调用,如frame改变。
在intrinsicContentSize的时候
这里比较容易忽视,有时候,系统调用intrinsicContentSize方法的时候,可能在自定义View的布局之前,所以这个时候要“强制”刷新布局、计算出当前状态下正确的contentSize
所以,有两处地方要加上:
- (CGSize)intrinsicContentSize {
    [self updateStairLayout];
    return _contentSize;
}

- (void)layoutSubviews {
    [super layoutSubviews];
    [self updateStairLayout];
}
自定义View小结
StairView的原理、代码都讲完了,算是一个典型的自定义的、根据内容决定高度的View案例,主要要注意的就是更新布局、contentSize的时机,以及及时invalidateIntrinsicContentSize通知布局系统更新
Case3: 给同一个属性添加多重约束,实现复杂关系
这个Case主要是为了纠正一个可能的误区:Autolayout里面,同一个属性,是可以加上多重约束的,或者说,同一个View的同一个属性,可以参与到多个约束里面的。
先看看Case的功能:
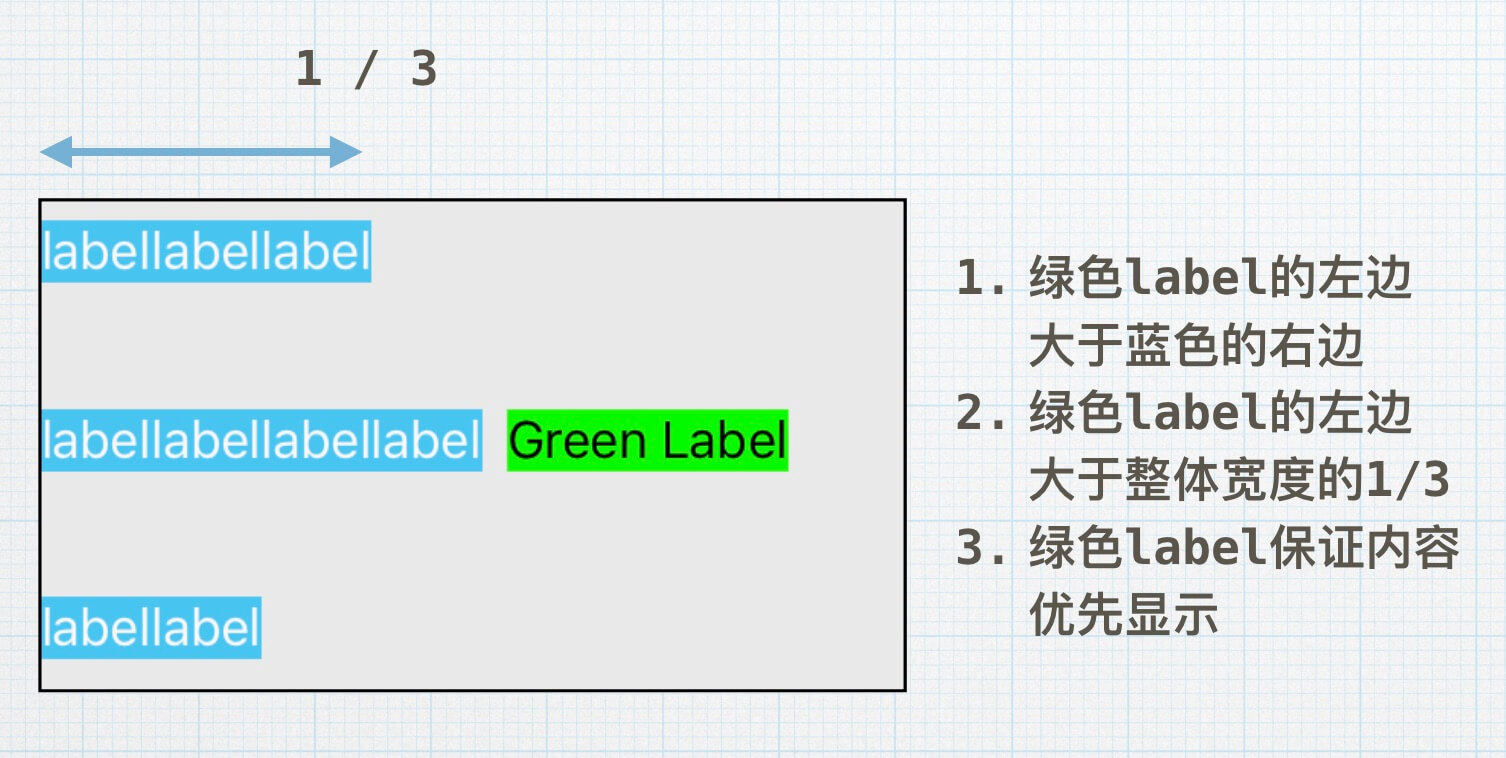
注意到,右边绿色label的左边,不仅要大于左边蓝色label的右边,还要大于整体宽度的1/3,所以,是要同时满足多条约束条件的。
区分观念:Frame布局和Autolayout的不同
按照Frame布局
按照传统的用Frame布局的方式,label的左边,其实就是label.frame.origin.x这个属性,所以,要左边满足条件的话,首先想到的可能就是:
// 满足大于蓝色label的右边
label.frame.origin.x > blueLabel1.frame.origin.x + blueLabel1.frame.size.width;
label.frame.origin.x > blueLabel2.frame.origin.x + blueLabel2.frame.size.width;
label.frame.origin.x > blueLabel3.frame.origin.x + blueLabel3.frame.size.width;
// 满足大于整体的1/3
label.frame.origin.x > (superView.frame.origin.x + superView.frame.size.width) / 3
这,乍一看,就是不停的在layoutSubView的时候做判断、处理。
按照Autolayout布局
而Autolayout是什么,是约束,是一种布局关系,只是对具体View的相关属性的一种关系设置,我们设置了约束,系统就会在需要的时候,按照约束,计算出每个View的frame,自动更新。
所以,同一个属性,完全是可以加多个约束条件的。
代码细节
一旦没有了一个属性一个约束的观念限制,这个Case的功能就很好实现了,关键代码如下:
// 创建绿色label
_greenLabel = [UILabel new];
[_containerView addSubview:_greenLabel];

// 设置内容抗压优先级最高
[_greenLabel setContentCompressionResistancePriority:UILayoutPriorityRequired forAxis:UILayoutConstraintAxisHorizontal];

[_greenLabel mas_makeConstraints:^(MASConstraintMaker *make) {
    // 垂直居中
    make.centerY.equalTo(_containerView);

    // 右边不超出
    make.right.lessThanOrEqualTo(_containerView);

    // 左边大于等于父View宽度的1/3,注意不是width属性
    make.left.greaterThanOrEqualTo(_containerView.mas_right).multipliedBy((CGFloat)(1.0f / 3.0f));

    // 循环,左边大于所有左边label的右边+8
    for (UILabel *label in _leftLabels) {
        make.left.greaterThanOrEqualTo(label.mas_right).offset(8);
    }
}];
只要约束没有冲突,我们设置的约束,就可以在各种情况下,按照需要生效。 对于这种内容动态变化,View之间关系复杂的情况,用Autolayout就非常有效了。
最后
这个系列居然已经出到了第五篇了,自己都觉得不可思议=。= 所有的例子都是日常工作中遇到、想到的,觉得算是一个点,就把它记录了下来,以后会一直坚持下去~